一个人的角落,也许并没人会看到这里~~ 祝福你,工作顺心,学习快乐~

应用技巧

图片伪造技术 - 使用exiftool对图片描述信息进行增删查改

通常,一张图片本身包含其所应该包括的图像像素内容以外,还包含了很多其它描述该图片元信息,比如图片大小,图片拍摄设备,拍摄时间,焦距,地理位置等,若经过中间处理,还可能包含剪辑软件名称,版本号,版权等信息。

图片在互联网上转发的过程中,也可能经过服务器的有陨/无损压缩,格式转换,大小裁剪,水印添加。根据服务器所使用的不同处理程序也有可能对元数据进行增删改等操作。

因此简单通过分析图片的元数据可以获得除本身所能代表的信息以外,还可能可以初步确定图片是否直接来自于手机或相机拍摄,是否经过修改之类。

exIftool是一个功能强大的命令行执行工具,exiftool.org,支持对大量常见的图片格式进行操作。具体信息见其官方网站说明。

一张经过ps处理的图片文件头如下:

1_raw_meta_info_ps_processed

在Padavan上实现支持RTSP网络摄像头的录像机功能

基于mt7621处理器的路由器通常都具有一个可扩展的USB接口,可以转接U盘,硬盘或者USB网卡之类。

既是路由器也是一个小型网络存储器,可省去额外配置一个nas,相比nas功能比较少,但也具有一定的可配置性。

这里简单介绍如何在运行类openwrt系统的路由器上实现网络录像机(NVR)的功能。

如今网络上的云摄像头已经卖到100元上下了,有萤石云摄像头,360摄像头,小米摄像头,TP-Link等,但这类型的摄像头都需要额外购买云存储服务才存储回放录像,显然这部分附加服务不具有性价比。

按照专物专用的原则,一台群晖也可以解决,但毕竟要多出一个东西。因此在路由器上实现类似NVR功能是最经济的做法。

很多云摄像头的商品描述页面,并不会直接写明支持RTSP传输,但会写支持NVR功能。

据我了解,TPLink全系均支持NVR功能,莹石云摄像机官方未显式支持但C2C/C3C/C6C等几个型号存在RTSP协议。

下面开始正文。

多站共存的Nginx配置下使用腾讯云CDN加速Discourse出现乱码的问题

上文讲述了在国内环境下加速Discourse的部署过程。

Discourse官方并不建议在同一主机上部署多个站点,但也提供了方案:Running other websites on the same machine as Discourse

按照官方的提供方案部署,通常可以正常将Discourse运行在standlone模式下,再通过Nginx反代访问。https的实现通过certbot也可以简单完成。

以下是nginx配置exsample:

在国内环境下安装Discourse

Discourse的版本升级与维护都是基于github来完成的,而Discourse本身又是基于ruby编写。

使用包括腾讯云的CVM、轻量服务器以及阿里云的ECS都存在国外网站访问慢的问题,主要是为了扶持国内git仓库做的限流操作。

在clone托管在github上的discourse时,可以通过将clone链接替换github.com为github.com.cnpmjs.org来加速对github的访问,比如:

git clone https://github.com/discourse/discourse_docker.git 替换为 git clone https://github.com.cnpmjs.org/discourse/discourse_docker.git

除此之外,在运行./discourse-setup时,安装程序同样会在docker中安装一些额外的的项目,

比如:gem update,同样需要添加ruby的镜像。

可以通过修改配置文件来添加ruby镜像地址,主要涉及到的文件有

grub-mkconfig 没有Windows项

不知道什么时候开始,我的grub2-mkconfig

找不到Windows的启动项了, 说严重也不严重,但小问题堆起来也会成为大问题的 于是乎,追根溯源, Windows 项原本是在/etc/grub.d/30_os-prober生成

查看其代码,发现使用了os-prober寻找其他系统. 运行发现没有输出,可以确定是这个东西在抽风了

回头一想,之前由于部分主板EFI记动的时候,会检测是否存在/EFI/Microsoft/Boot/bootmfgw.efi,如果存在的话,会直接启动他,所以将其改名了. 将其改回再测试,os-prober可心正常找到Windows项了

于是乎,os-prober要改的话基本没戏,还是写脚本吧,

 vi /etc/grub.d/40_custom

直接将启动项加入就行了.

关于 grub 请详见官方文档!

Bash快捷键 记录备忘

生活在 Bash Shell 中,熟记以下快捷键,将极大的提高你的命令行操作效率。

编辑命令

  • Ctrl + a :移到命令行首
  • Ctrl + e :移到命令行尾
  • Ctrl + f :按字符前移(右向)
  • Ctrl + b :按字符后移(左向)
  • Alt + f :按单词前移(右向)
  • Alt + b :按单词后移(左向)
  • Ctrl + xx:在命令行首和光标之间移动
  • Ctrl + u :从光标处删除至命令行首
  • Ctrl + k :从光标处删除至命令行尾
  • Ctrl + w :从光标处删除至字首
  • Alt + d :从光标处删除至字尾
  • Ctrl + d :删除光标处的字符
  • Ctrl + h :删除光标前的字符
  • Ctrl + y :粘贴至光标后
  • Alt + c :从光标处更改为首字母大写的单词
  • Alt + u :从光标处更改为全部大写的单词
  • Alt + l :从光标处更改为全部小写的单词
  • Ctrl + t :交换光标处和之前的字符
  • Alt + t :交换光标处和之前的单词
  • Alt + Backspace:与 Ctrl + w 相同类似,分隔符有些差别 [感谢 rezilla 指正]

Add Sublime Text to your context menu on right click

When opening a text file, you may be used to right click on the file to be opened and then choose the application which can open the file from the context menu. On the context menu, you may see a menu item like "Edit with Notepad++".

Nowadays many people especially programmers like to use Sublime Text, but by default this application will not show on the context menu when you right click on a file. There is now frequent request to add this application to the context menu. Here we show a simple batch file which can help you achieve this.

Below is the batch code :

@echo off
SET sublimeTextPath=C:\Program Files\Sublime Text 3\sublime_text.exe

REM ADD REGISTRY KEYS
@reg add "HKEY_CLASSES_ROOT\*\shell\Open with Sublime Text 3"         /t REG_SZ /v "" /d "Open with Sublime Text 3"   /f
@reg add "HKEY_CLASSES_ROOT\*\shell\Open with Sublime Text 3"         /t REG_EXPAND_SZ /v "Icon" /d "%sublimeTextPath%,0" /f
@reg add "HKEY_CLASSES_ROOT\*\shell\Open with Sublime Text 3\command" /t REG_SZ /v "" /d "%sublimeTextPath% \"%%1\"" /f

pause

You just need to copy above code into the text editor you like and save it as a batch file. Note, please change the sublimeTextPath to the sublime_text.exe on your system. Then, what you need to do is right click on the batch file you saved and "Run as administrator" and it should show below:

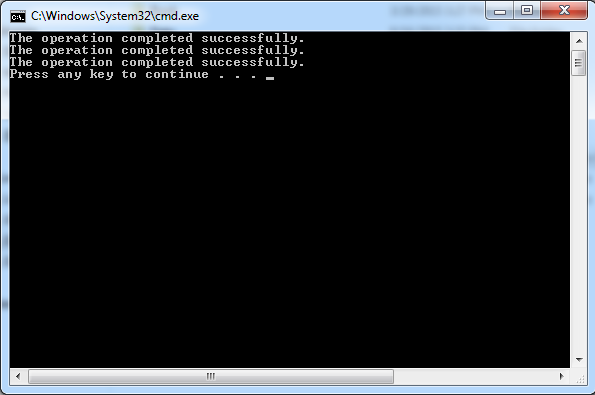
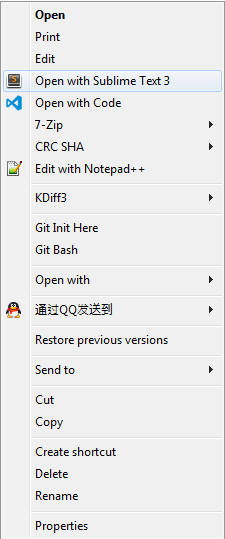
This means you have successfully added Sublime Text to your context menu. Then you can verify this by right clicking on any text file and you should see below:

Please note that you need to run the batch file as administrator, otherwise you will see errors on the command line console.

Vim: Save file in read-only mode without restart your work

Open a file as normal, forgetting to use “sudo”, and therefore viewing a read-only file.

Then mistakenly try to edit the read-only file in the traditional manner.

:w !sudo tee%

At this point we will be presented with the content of the file and a prompt to press ENTER or type another command.

To simply save the file and move on we just press ENTER, and then press the letter “O” (oh).

(NOTE: “L” seems to do pretty much the same thing.)

The file will be saved but remains open in vi/vim for more editing or reading.

We can now exit normally by typing “:q!” since the file is still open as “read-only”.

What the command does:
:w = Write a file.
!sudo = Call shell sudo command.
tee = The output of the vi/vim write command is redirected using tee.
% = Triggers the use of the current filename.
Simply put, the ‘tee’ command is run as sudo and follows the vi/vim command on the current filename given.

Must issue sudo alsa force-reload on reboot (Ubuntu)

I have a problem, I have got sound working...

But only when I issue the Code:

sudo alsa force-reload

It will when play the sound that was queued to play, like the login sound.

Everytime when I restart, I have to do Code:

sudo alsa force-reload 

in order for sound to work.


Solution :

	sudo gedit /etc/default/acpi-support
	# Add modules to this list to have them removed before suspend and reloaded
# on resume. An example would be MODULES="em8300 yenta_socket"
#
# Note that network cards and USB controllers will automatically be unloaded
# unless they're listed in MODULES_WHITELIST
MODULES="soundcore"