午睡的时候,朋友发来个题,反正闲也闲着,来练练手。
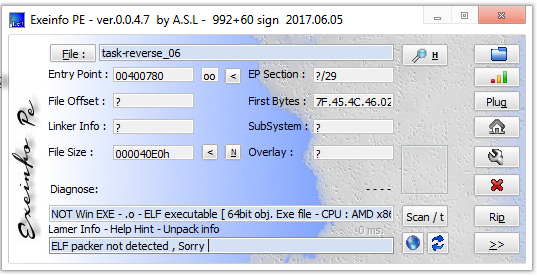
#1 查壳
拿到程序先确认使用的是什么编译器,什么环境下运行,以决定用何种工具。
程序无花无壳,直接上IDA静态了,CTF的题在实机调比较方便。
杨意不逢,抚凌云而自惜;钟期既遇,奏流水以何惭?
午睡的时候,朋友发来个题,反正闲也闲着,来练练手。
拿到程序先确认使用的是什么编译器,什么环境下运行,以决定用何种工具。
程序无花无壳,直接上IDA静态了,CTF的题在实机调比较方便。
在CMS中,tag和categoly的实现方式虽大体相同,但功能和用途却不同。
而当前各种Pages服务仅支持有限的官方插件,自定义插件功能更是可望而不可及,要满足文章自动分类功能实在要用插件完成,之前一直通过本地生成jekyll的方式进行部署。
近日在开发awesom-weblog的时候发现一种不用插件的方法来生成不同的分类的页面。
一、分类页渲染模版(Layout)
由插件版到无插件的迁移会比较简单,已经有存在了分类页文章渲染模版(Layout),无模块的可以参考首页模版进行修改。
示例(categoly.html
)如下:
<div id="content">
<div class="box archive-meta">
<h3 class="title-meta"></h3>
</div>
</div>
这里用到的是site全局中的categories属性,该属性以字典的形式存储了所有分类,以及该分类下的post。
比如:我们只需要通过调用site.categories['Linux']
便可以拿到该分类下的所有文章。
二、为分类创建分类页而
在layout已经创建好之后, 我们只需要通过该Layout对每个分类进行渲染,而渲染的方法,就是通过创建多个Layout的实现,使其传入不同的page.cat参数,便可生成不同的分类页面了。
一个Layout的实现如下:
添加categories目录,并在目录下创建一个名为Linux.html
的文件:
---
layout: category
cat: Linux
---
此实现只需传入分类名无需带任何content,其它分类同样创建不同分类名文件,并传入分类名。
此外,可通过添加permalink:
参数自定义目录生成的链接位置。
三、自动创建分类页面
由于分类页面实在简单,但如果分类较多的话,可能通过批量命令的方式,创建页面。
首先获取到博客的分类列表,形成txt文档,每行一个。
在categories目录下创建bash程序autogencat.sh
:
#!/bin/bash
while read catname
do
cp Linux.html $catname.html
sed -i "s/Linux/${catname}/g" ${catname}.html
done
添加执行权限并且执行:
chmod +x autogencat.sh
./autogencat.sh < catlist.txt
程序会将Linux.html做为生成模板,复制生成其它分类文件,以后新增分类只需要更新catlist.txt目录列表,运行脚本即可。
通过uniflash工具,删除 /sys/下的bin文件 参考 https://e2e.ti.com/support/wireless_connectivity/simplelink_wifi_cc31xx_cc32xx/f/968/t/625681
通过在安卓手机上使用logcat显示smartconfig日志,发现程序访问了,mysimplelink.net这个域名,并且无法解析这个域名。
所以恍然大悟发现自己使用了影梭vpn,将会使用我的代理进行DNS解析,由于这是个本地域名,需要使用板载dns服务器。
此外,还发现,板载的HTTP服务器还提供,RESTful API接口,可以对通过POST对芯片配网等参数进行修改。
成功配网后,串口调试信息显示: [Provisioning] Profile Added: SSID: LanBing’s_Wiki-Free [Provisioning] Profile confirmation: WLAN Connected! [Provisioning] Profile confirmation: IP Acquired!
但reset之后,设备不会自动使用保存的密码进行连接。
原因是cc3220的连接策略有四种选项组合:
其中Auto Provisioning就是在设备启动之后自己进行连接。
详见文档SWRU455E
3.3.3.1节。
这里有三种方式可以对策略进行修改:
SWRU455E 节8.4.7
github pages服务由于安全性的考虑,对其原生jekyll的支持插件进行了过滤。使得只能使用其有限的插件,而且无法使用自定义的插件。这导致了很多问题,比如不能按自己的规则生成归档文件或者分类目录,甚至部署爬虫之类等等。
具体详见: https://pages.github.com/versions/
而国内几大git服务商(Coding,码市之类),也对支持的插件进行了限制,所以在多数情况下,还是选择在本地搭建Jekyll环境,生成静态页面直接上传。
但这极大限制了Jekyll的Markdown in Anywhere便利性,需要在不同的系统上都装上Jekyll的开发环境。
## 现在讨论一种利用中间生产服务器代替本地发布过程的方法。
依赖:一台部署gh-hooks-server的VPS
既然选择不使用git的原生jekyll,也那么需要两个branch, 一个用于jekyll源码的存放, 一个用于托管静态代码
通过一台中间服务器,当源branch进行了更新,则通过webhook自动通知gh-hooks-server,使其执行pull、push操作。
VPS的jekyll环境的搭建不再赘述【首先安装rvm,ruby, 再装jekyll以及插件比如jekyll-paginate】
下面演示安装gh-hooks-server并启动
git clone https://github.com/c834606877/gh-hooks-server.git
cd gh-hooks-server
python setup.py install
ghhooks -a updatemypre:/home/lanbing/updatemypre.sh --secret s3cret
程序启动后会侦听8011端口,处理http://0.0.0.0:8011/ghhooks/updatemypre
的请求信息,当请求密码通过后,执行对应的bash脚本。
故,我们只需要对源Branch的push消息发送webhook,当gh-hooks-server接收收post消息后,pull 源 Branch,jekyll编译,然后push到Pages Branch。
为了兼容手动发布,编写了一个makefile
,用于本地自动发布的脚本:
temp-folder = /tmp/jekyll-temp-site/
repo = git@git.coding.net:iziy/iziy.git
JEKYLL = jekyll
s:
${JEKYLL} server
build:
${JEKYLL} build -d ${temp-folder}
deploy: build
cd ${temp-folder} ;\
git init ${temp-folder} ;\
git checkout -b coding-pages ;\
git remote add origin ${repo} ;\
git add -A ${temp-folder} ;\
git commit -m "deployed by make" ;\
git push origin coding-pages --force
push:
git add -A
git commit -m "pushed by make"
git push
clean:
rm -rf ${temp-folder}
而对于webhook响应的脚本为updatemypre.sh
:
#!/usr/bin/bash
echo "webhook enter!"
source /usr/local/rvm/scripts/rvm
cd iziy
git pull
make deploy
自从换上轻量级的桌面管理器DWM
之后,屏幕利用率得到了提升。但是,由于在dwm仅仅是一个桌面管理器,并不具备其它一些实用功能,比如Ubuntu的NightMode,控制中心等,只有在Gnome环境下才能使用。
之前使用 CustomXSession,调用/etc/X11/Xsession
,接着调用~/.xsesseion脚本启动dwm,比如ibus,gtk,相关的配置均在用户目录下的.xsession
脚本中完成。
而现在通过gnome-session --session=dwm-gnome
方式调用dwm-gnome脚本,由dwm-gnome调用dwm启动,此外,在 /usr/share/gnome-session/sessions/
下建立同名session文件,模仿gnome.session,填写RequiredComponents,并且去除org.gnome.Shell
,这些组件的启动将会由Gnome-Session进行统一启动管理。
自动安装方案在ArchLinux下有相应关的包可供下载:
pacman -S dwm-gnome
Ubuntu 可以通过Makefile进行安装:
dwm-gnome: https://github.com/palopezv/dwm-gnome
由于Ubuntu非LTS版,官方维护周期为9个月,遂更新了Ubuntu从17.04到17.10。
然而更新之后Gnome的桌面管理器(GDM),主题被修改成了类Ubuntu风格橘红色。
这种奇葩的风格,也许只有Ubuntu的创始者们才喜欢吧。
最初想法是寻找到gnome-look上找到原版gdm主题,果然发现了很多好看的主题,类XP,类WIN789,类osx。但花虽美,却不是我想要的。
随着google一通之后,发现解决方案也简单,
sudo update-alternatives --config gdm3.css
There are 2 choices for the alternative gdm3.css (providing /usr/share/gnome-shell/theme/gdm3.css).
Selection Path Priority Status
------------------------------------------------------------
* 0 /usr/share/gnome-shell/theme/ubuntu.css 10 auto mode
1 /usr/share/gnome-shell/theme/gnome-shell.css 5 manual mode
2 /usr/share/gnome-shell/theme/ubuntu.css 10 manual mode
Press <enter> to keep the current choice[*], or type selection number:
GDM在/etc/alternatives/
目录下有设置了一些可选项,其中就包括了控制gnome-shell主题的配置选项,而更新的Ubuntu只是新增了该选项,并增加了优先级。
如此,可以比较方便的通过update-alternatives
命令来修改gdm主题了。
参考
这阵子打算换Arch的时候,想在Ubuntu最后折腾一番,没想到apt update的时候出现了其怪的事情。
lanbing@LanBing-Ubuntu:~$ sudo apt update
Hit:1 http://ppa.launchpad.net/webupd8team/sublime-text-3/ubuntu zesty InRelease
Ign:2 http://cn.archive.ubuntu.com/ubuntu zesty InRelease
Ign:3 http://cn.archive.ubuntu.com/ubuntu zesty-security InRelease
Ign:4 http://cn.archive.ubuntu.com/ubuntu zesty-updates InRelease
Err:5 http://cn.archive.ubuntu.com/ubuntu zesty Release
404 Not Found [IP: 91.189.91.23 80]
Err:6 http://cn.archive.ubuntu.com/ubuntu zesty-security Release
404 Not Found [IP: 91.189.91.23 80]
Err:7 http://cn.archive.ubuntu.com/ubuntu zesty-updates Release
404 Not Found [IP: 91.189.91.23 80]
Reading package lists... Done
E: The repository 'http://cn.archive.ubuntu.com/ubuntu zesty Release' does not have a Release file.
N: Updating from such a repository can't be done securely, and is therefore disabled by default.
N: See apt-secure(8) manpage for repository creation and user configuration details.
E: The repository 'http://cn.archive.ubuntu.com/ubuntu zesty-security Release' does not have a Release file.
N: Updating from such a repository can't be done securely, and is therefore disabled by default.
N: See apt-secure(8) manpage for repository creation and user configuration details.
E: The repository 'http://cn.archive.ubuntu.com/ubuntu zesty-updates Release' does not have a Release file.
N: Updating from such a repository can't be done securely, and is therefore disabled by default.
N: See apt-secure(8) manpage for repository creation and user configuration details.
尝试了国内的几个主流源:
https://mirrors.tuna.tsinghua.edu.cn/ubuntu/
http://mirrors.aliyun.com/ubuntu/
http://ftp.sjtu.edu.cn/ubuntu/
均出现了类似的错误,后改为官方的源,同样出现此错误,还莫名其妙多出几百个Ign。 仔细到源目录下分析 发现确实不存在http://cn.archive.ubuntu.com/ubuntu/dists/zesty/Release
原来官方把17.04 zesty这个版本的源移到了old-release。 然而国内大部分源也是同步了官方的源,导致了找不到相关源的信息。
遂将source.list源修改成官方的
http://old-releases.ubuntu.com/ubuntu
于是apt update可以顺利更新了。
但问题又来了,由于官方的源在国外,更新速度太慢,眼看着50M的带宽不满足于此。
最后,发现中科大的镜像源提供了old-release,于是:
sudo vi /etc/apt/source.list
将源地址换为:
http://mirrors.ustc.edu.cn/ubuntu-old-releases/ubuntu
lanbing@LanBing-Ubuntu:~$ cat /etc/apt/sources.list
###### Ubuntu Main Repos
deb http://mirrors.ustc.edu.cn/ubuntu-old-releases/ubuntu/ zesty main universe
###### Ubuntu Update Repos
deb http://mirrors.ustc.edu.cn/ubuntu-old-releases/ubuntu/ zesty-updates main universe
参考:
![http://www.cnblogs.com/jiangz/p/4076811.html]http://www.cnblogs.com/jiangz/p/4076811.html